Project Proposal:
By using augmented reality as a tool to introduce surrealistic environments in the real world with digital models, it creates a new dimension that examines the mind’s reaction to the unexpected change of spatial conditions through the act of looking into the new space. As evident from the second assignment and various video references, augmented reality can be applied in a manner which interact with physical elements in the world, such as virtual accessories that can be worn by the user, or create the illusion of openings in solid walls. Through a series of 2 installations, I will attempt to change the user’s impression of the original spatial state by superimposing a digitally created space over it.


For the first installation, I will create a small scale physical box in which the user can view into with a pair of webcam glasses, this will detect the marker which is attached to the opposite end of the wall and will project an interior/exterior scene that is at a scale greater than the physical box. On the top side of the box will have slits that will hold multiple frames of markers, generating different scenes similar to the retro View Master projector. Together with animations this will test the user response to each of the virtual environments.


As the first installation focuses predominately on looking into a device that demonstrates augmented reality. The second installation will transform the space in which the user occupies into augmented reality with the use of webcam glasses. By increasing the digital model to a real life scale, I will create a virtual pit below the user that will change their perception of the ground in which they stand on.

Assessment Criteria:
Have thought and care been invested into all aspects of the design process in context to the
technology you have experimented with throughout the course, including a noticeable attempt to
engage with the technology in a creative way.
Blog: Is your blog neatly laid out and easy to follow, with all task requirements posted to
your blog?
Images: Are your images of an acceptable quality, showing thought and consideration to
image selection and camera framing? Are all images not your own referenced
correctly?
Text: Is any text you have written concise and informative? Is the text significant to
your project, outlining aspects of your process that may not be immediately
apparent through visual material?
Installation: Does your installation work? Is there a novel approach to the interaction between
real life and digital content? Does the final installation relate to the initial aim of your research?
Submission Requirements:
The software that will be used to construct my augmented reality environments will be ARive (more updated version to buildAR), it has a greater range of supported file formats and it has a better sensitivity in detecting markers, and generates digital models at a bigger scale when compared to buildAR. It also allows for the creation of markers with thinner borders and more complicated patterns. Some detailed models made for the scene will be created with photosynth, and imported to be detected by the markers.
For the final exhibition, I will be using a pair of webcam glasses, custom marker box to demonstrate my project in real time. It will also include a short video documenting the experiments made.

ARive Homepage: http://www.arive.net/
Trial 1 in ARive:
After spending some time in ARive, I realised that there isn't an option to export xml, rather it is permanently stored in the common xml library which is read from when the software is started, the xml library file however can be located in the install folder for editing.
Installation 1 - Small Container, 3 Large Spaces


In order to create a first person view into the landscape, as oppose to the typical aerial view of looking at the model as a whole, the scale of the model will be increased to the right size to fit the framed view. Below shows the intended view to be seen by the observer through the viewer.

Scene 2: To contrast the previous space of looking out to an open field, I have modeled the interior of an ancient ruin at a scale that contradicts the size of the physical box the viewer is looking into to maintain the sense of surreal experience. To create a focus within the internal space, an animated artifact is created that repeatedly spins as it hovers.
Similar to the first scene, the digital model was required to be scaled to the right size to correctly frame the scene which is observed by the viewer.

Scene3: Tunnel Scene. I will refrain from disclosing any description on this scene as it attempts to demonstrate the effectiveness of augmented reality in affecting the viewer's reaction. For this to have an accurate outcome, it depends on first hand experience without any prior knowledge of the content.
ARive utilize an alternative method for marker registration, by detecting a marker through the use of a webcam, the software can locate the bounding box of the marker and store the pattern that's within it as a patt file. One easier way I have found for webcam to pick up markers easier is to read the marker pattern directly from a monitor when experimenting. (click image for full view to see the red/green border that highlights the bounding box.)

Problems Encountered:
- Noticed that some of the faces were no showing texture when viewed through ARive, later figured out that the normals were in need of flipping.
- Having exported an .ive file that contains an animation, ARive fails to play the animation and only display the specific frame of the model shown in 3ds max when it was exported. Later realised that in order for an animation to be exported in full, the geometry that has the animation need to first be grouped.
- When attempting to register a new marker into the software for detection, the .exe file that performs this task failed to locate the camera_para.dat file that was necessary to open the tracking viewer. After some research I discovered that ARive was a created based on ARtoolkit source, thus sharing a similar .exe for marker registration.
- As I reached the end stage of the project for marker creation and testing multiple markers, I realized the shortcomings of ARive. The software did not allow multiple markers detections. Also only one active model can be displayed in the viewer. After reading the user manual however, I discovered that while these features cannot be found through the user interface, the engine however do support projecting up to 2 digital models with 2 separate markers. This however needs to be done through the windows command line.
- One observation made when creating markers is that it cannot be symmetrical along the horizontal axis, this will cause confusion for ARive in determining the correct side up.
http://www.artoolworks.com/support/library/Creating_and_training_new_ARToolKit_markers
PROCESS FOR EDITING TXT FILES AND ATTACHING MARKER TO DIGITAL MODELS:
1. Create patt.marker by using ARtoolkit's mk_patt.exe.
2. Paste patt.marker into ARive's data folder.
3. Paste .ive file into ARive's root folder.
4. Open arive_marker.dat file in notepad and edit the corresponding first and second patt.marker.
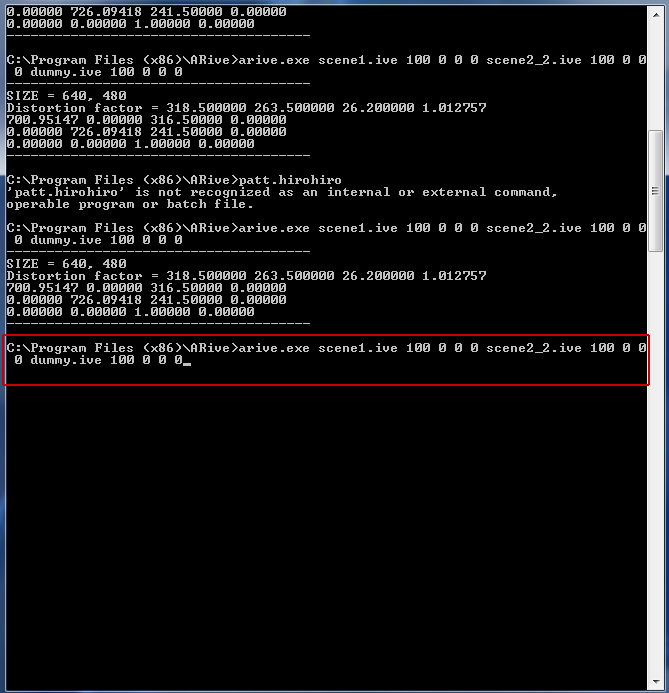
5. Open up windows cmd.exe and type navigate to ARive folder.
6. Execute ARive with the following format: Arive.exe [MODEL1] [SIZE] [SHIFT-X] [SHIFT-Y] [SHIFT-Z] [MODEL2] [SIZE] [SHIFT-X] [SHIFT-Y] [SHIFT-Z]
Arive.exe mymodel.ive 100 0 0 0 mysecondmodel.ive 100 0 0 0
Installation 2 - The Pit
Initial trials of merging digital spaces on real life surfaces has proven to be more difficult than anticipated, I begun the experimentation with a simple hollow box that is positioned below the ground plane in the modeling software.

Positioning Test: Due to the lack of lighting inside the box, when displayed in AR software the model appear to lack depth, below shows a comparison between ARive and BuildAR.
BuildAR: It is possible to see into the box with heavy shadows, however though it's below the virtual plane, the eye need to directly above the box to experience the depth, at any other angle the sides of the box will be shown.
ARive: The box appears to be completely black, apart from the outer edges no details can be seen.
Light Test: Once light has been added into the box, the sense of depth is more apparent in both software. Below is another comparison between the two software's quality in projecting the digital model.
BuildAR: As visible the interior of the 'pit' is brighter, however when the file was exported as an ive in 3ds max, the positioning of the model in BuildAR differs from when it was in 3ds max, meaning I had to manually adjust the position. The webcam view also appears to be shaking alot even when the webcam itself is stable.
ARive: The model now display detail of the box interior, the render of the box also appear more clear and sharp as compared to 3ds max, portraying a more realistic experience when looking into the box.
Marker Distance Test: By positioning the marker at a greater distance, the sensitivity of the tracking decreases resulting in constant shaking of the digital model, hence the size of the marker have a big effect on the model display.
Limitations: Due to the nature of both software, no matter the position of the digital model in virtual space, when a physical object overlap with the digital model, it goes underneath the model, thus eliminating the illusion created.
Textured Model Test: In order to experiment with the degree of realism augmented reality can provide to the physical environment, the simple box is replaced with a more detailed and textured model. The initial tests shows that even with a more realistic model, it is still hard to create the illusion of a 'fixed' pit as the model continues to move due to the lack of accurate detection of the marker by the webcam.
Possible Improvements: With the limitations that I have currently come across, I have come up with 2 ways of improving the augmented reality experience. The first would be to bound the marker around a physical border that has depth, this will elevate the observer and enhance the sense of a augmented reality pit. The second way is to modify the digital model in a way to accommodate for a physical plank to be implemented, a visual diagram is shown below to demonstrate my intentions.

No comments:
Post a Comment